How to draw ...
a tree
a tree is the 15th most searched thing that people want to draw and here is how it compares to other things in Nature > Plants.
But do people always want to draw a tree?
Interest over time on "how to draw a tree" in the U.S.
Cycle
The search volume consistently spikes in December every year, indicating a seasonal pattern possibly related to holiday activities or events.
And how does it compare to the most popular things to draw among Plants?

Interest over time on "how to draw a tree" comparing to top 3 in Plants category
data from Ahrefs Keyword ExplorerWhich countries are most interested in drawing a tree?
| United States | 🇺🇸 | 3,200 | |
| India | 🇮🇳 | 1,600 | |
| United Kingdom | 🇬🇧 | 700 | |
| Nigeria | 🇳🇬 | 600 | |
| Canada | 🇨🇦 | 350 |
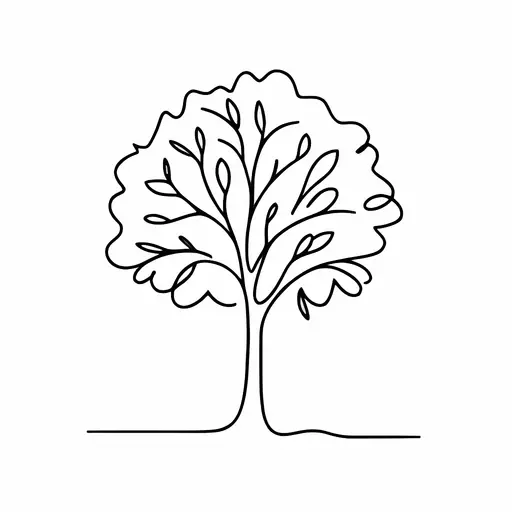
How to draw a tree step-by-step
Drawing a tree presents challenges such as capturing the organic complexity of its branching structure and the varied textures of its bark and leaves. Strategies for overcoming these challenges include studying real trees to understand their anatomy, using gestural sketches to capture the tree's overall form, and employing shading techniques to convey depth and texture. Emphasizing key features, like the root spread and leaf pattern, helps create a believable and aesthetically pleasing representation.
Here are the steps to drawing a tree:
- Sketch the Trunk: Begin by lightly sketching two vertical lines that slightly curve outward at the base to form the trunk. Adjust the width based on the type of tree you're drawing—wider for a sturdy oak or narrower for a slender birch.
- Outline the Canopy: Above the trunk, draw a rough, cloud-like shape to outline the tree's canopy. This will form the leafy top of your tree. Vary the shape to reflect the type of tree, such as rounded for a maple or more irregular for an oak.
- Add Branches: Extend several curving lines upwards and outwards from the top of the trunk to create the main branches. These lines should branch out further into smaller lines to give the appearance of twigs.
- Define Bark Texture: Draw vertical and horizontal lines along the trunk and branches to give texture to the bark. Use jagged or wavy lines to suggest different bark patterns, like the smooth texture of a beech or the ruggedness of a pine.
- Shape the Leaves: Inside the canopy outline, fill in the leaves using small oval or teardrop shapes. Cluster these shapes together, leaving some spaces for a more natural look. You can add a few individual leaves on the branches and around the base for added detail.
- Create Shadows and Depth: Shade the undersides of the branches and some sections of the leaves to add depth and realism. Consider the light source direction and use cross-hatching or soft pencil strokes for the shadows to enhance the three-dimensional effect.
- Finalize and Refine: Review your drawing, darken essential outlines, and erase unnecessary guidelines. Add any final touches, such as extra leaves or ground details, like roots or grass, around the tree base.
Common mistakes
- Flat Canopy: People often draw the tree canopy as a perfect circle or flat shape, which can make the tree look unnatural. Real canopies have varied shapes and textures.
- Uniform Bark Texture: Beginners may render the tree trunk with a uniform texture or pattern, which lacks the irregularities and variations found in real tree bark.
- Symmetrical Branches: A common mistake is drawing branches that are too symmetrical and evenly spaced. In reality, branches grow in diverse patterns and angles.