
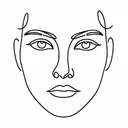
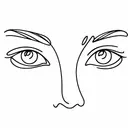
How to draw ...
feet
feet is the 90th most searched thing that people want to draw and here is how it compares to other things in People > Body Parts.
But do people always want to draw feet?
Interest over time on "how to draw feet" in the U.S.
Cycle
The search volume for the keyword 'feet' shows consistent year-over-year increases in March and April, possibly related to changes in seasonal activities and fashion trends during spring.
And how does it compare to the most popular things to draw among Body Parts?

Interest over time on "how to draw feet" comparing to top 3 in Body Parts category
data from Ahrefs Keyword ExplorerWhich countries are most interested in drawing feet?
| United States | 🇺🇸 | 169,000 | |
| India | 🇮🇳 | 35,000 | |
| United Kingdom | 🇬🇧 | 30,000 | |
| Canada | 🇨🇦 | 15,000 | |
| Philippines | 🇵🇭 | 12,000 |
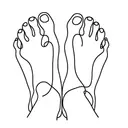
How to draw feet step-by-step
Drawing feet presents a significant challenge due to their complex anatomy and varied postures. Artists often struggle with proportional accuracy, foreshortening, and capturing the subtle curves and angles. Key strategies include studying skeletal and muscular structures, practicing different foot positions, using reference images, and focusing on line weight and shading to convey depth and texture. Emphasizing the positioning and relationship of toes, arches, and ankles is crucial for achieving realistic depictions.
Here are the steps to drawing feet:
- Outline the Foot Shape: Begin by drawing a rough, elongated oval or rectangle to represent the general shape and size of the foot. Position it according to the angle you want to capture, as this will serve as the base for the foot’s structure.
- Sketch the Ankle and Heel: Attach a small oval or circle at one end of your shape to represent the heel. Then, draw lines extending upwards to form the ankle, making sure to show any curves based on the position of the foot.
- Define the Arch and Instep: Draw a curve along the length of the foot to outline the arch and the instep. This will add depth and more realistic volume to your drawing. The curve should flow naturally from the heel towards the ball of the foot.
- Outline the Toes: Divide the front of your outline into five sections for the toes. Start by sketching basic forms for each toe, keeping in mind that toes decrease in size from the big toe to the little toe. Ensure the toes match the angle and perspective of the foot.
- Shape the Toes and Add Details: Refine the shapes of the toes by adding curves and emphasizing joints. Toes have distinct knuckles and padding, which should be gently shaded or outlined to provide depth. Pay attention to the toenail shapes and sizes for added detail.
- Add Muscle and Bone Details: Lightly sketch in the tendons, muscles, and bone structure visible on the surface of the foot. Focus on areas around the arch, ankle, and the top of the foot, where muscles and bones can be more prominent.
- Refine and Add Texture: Go over your drawing to refine lines and add any necessary textures, such as soft shading to indicate skin texture or shadows for realism. Use gentle lines for creases and wrinkles where the skin naturally folds, such as along the toes or around the ankle.
- Finalize with Shading: Complete your drawing by adding shading to give volume and depth. Focus on light sources and shadows to make the foot appear more three-dimensional. Highlight areas like the top of the foot, the toes, and the arch to elevate realism.
Common mistakes
- Proportion Issues: Many artists struggle with getting the proportions of the foot correct, often making them too long or too short relative to the rest of the body.
- Over-Simplifying Toes: Toes can be difficult to draw, leading some artists to simplify them into unrealistic shapes, which detracts from the natural appearance of the foot.
- Lack of Perspective: Failing to correctly depict the foot in perspective is common, resulting in flat or distorted images that do not account for depth or the angle at which the foot is viewed.